Dencoin Documentation
Introduction
This blog explains how i built my small cryptocurrency from scratch. The reason i built the system was to understand blockchain technology and add one more interesting project to my portfolio. It took me 2 and half month to study and build the cryptocurrency. For this blog i will assume that you have a small understanding of how cryptocurrecy and blockchain works.
What is CryptoCurrency?
Cryptocurrency is an electronic money created with technology controlling its creation and protection, while hiding the identities of its users.
Cryptocurrencies are a digital cash designed to be quicker, cheaper and more reliable than our regular government issued money.
With public records, cryptocurrencies don’t require you to trust a bank to hold your money. They don’t require you to trust the person you are doing business with to actually pay you. Instead, you can actually see the money being sent, received, verified, and recorded by thousands of people. This unique positive quality is known as trustless.
Each transaction is recorded on a digital record kept by many people across the world known as the blockchain. The data on the blockchain is publicly available and stored on many computers. Because there are so many copies being simultaneously maintained, the transaction and banking data is very safe, and virtually impossible to manipulate.
You can read more about cryptocurrrency here
Framework i used to build the system
-
Anaconda with python 2.7
-
External Python Libraries
-
Twisted Communication library
-
Pyqt5 GUI library for the nodes
-
Ecdsa a library used to generate public, private key pair and is used to sign a text (contract)
-
How Dencoin Works
To explain the system clearly, i will use a top down approach. we will Starting from the top level design and explain the individual parts in more detail.
- Top level Design
- Full Node
- Peer to Peer network
- Blockchain
- Mining
- Transaction
- Wallets
Top Level Design
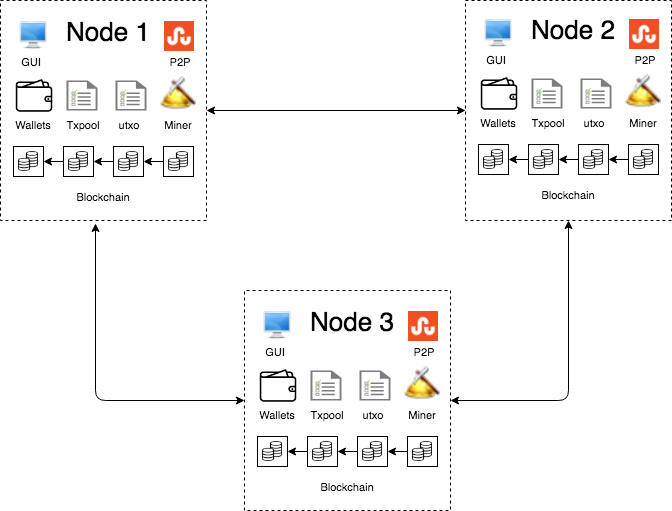
The dencoin network consists of Nodes (computers that are both client and server) each holding a copy of the blockchain, mine new blocks and manage transactions and wallets. And all nodes communicate via a peer to peer network.
Node
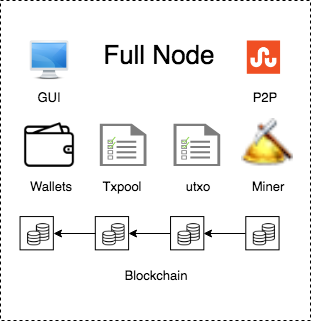
A full node is a computer that can perform all the actions neccessary to manage a cryptocurrency and can collaborate with other computers(full nodes).
A full node consists of the following components.
-
P2P (Peer to Peer) network - Using peer to peer communication module, the node acts as both server and client to communicate with other nodes. Using this network, a node can send or receive new transactions, blocks and copy of the blockchain to or from its neighbouring nodes. This network will enable a node to know what other nodes know.
-
Blockchain - Blockchain is a big file that contains all the transactions made eversince the cryptocurrency was online. A blockchain is made of a chain of blocks and each block contains a number of transactions. In other words, a block is a ledger and blockchain is a library of ledgers. You can read more about blockchain here.
-
Txpool (Transaction Pool) - Transaction pool is a collection of transactions that have not yet been added into a block. When a new transaction is created, it’s broadcasted to all nodes and added to each node’s txpool. After the transaction is added to a block, the transaction is removed from the txpool.
-
utxo (Unspent Transaction Output) - utxo is a list of unspent transactions. For example, if alice sends bob 10 coins, it means that bob has now 10 coins at his disposal until he spends it. therefore bob’s 10 coins will be added to utxo list. so when bob wants to send some coins to other people, the system will know he has 10 coins from utxo list. Like Txpool all utxo are synchronized by all existing nodes.
-
Wallets - A Node can have a list of wallets where each wallet contains public address, private key and account balance. A fullnode can have unlimited number of wallets. A public address is a wallet’s identification number. the wallet owner gives the number to other people to receive coins and ask other node’s wallet’s public address to send them coins. When a wallet owner wants to send money to another wallet, the sender will use their wallet’s private key to sign a transaction. If a wallet owner lose their private key, they can never access their money.
-
Miner - The miner is the most computationally intensive part of the node. When all nodes contain the same txpool and utxo, there needs to be a competition for who gets to add those transactions into a block and broadcasts the block to other nodes. The node who is the first to generate a block and broadcasts it, will get all transaction fees and get a certain amount of coin for winning. In Dencoin, the winner gets a
100 DCN. There are many types of competitions that nodes participate in to generate a block first. The one i used for this project is called proof of work. You can find more about proof of work here. -
GUI - The Graphical user interface is used to create transactions, manage wallets and manage the blockchain in a conveniently.
Peer to Peer Network
For a peer to peer network to work, each node has a builtin server and client modules. the server part is used to serve data to nodes that are connected to host node. and the client part is used to connect to other nodes to fetch data. Every node has an address book to store the address of the nodes they are connected to.
Let’s say a new node Node 4 as shown in the above image, wants to join the Dencoin network. The first rule is that Node 4 needs to have at least one known node address to connect to. In this case, Node 4 knows the address of Node 2. After Node 4 connects with Node 2, Node 4 asks Node 2 to send it more node addresses. Node 2 inturn sends the list of node address Node 1 address and Node 3 address from its addressbook to Node 4. Finally Node 4 connects to Node 1 and Node 3 and asks them for other node address repeating the above steps. Node 4 will continue to connect to nodes until it’s connected to all nodes in the network or reaches a maximum allowed connection, which in Dencoin case is 10 connections.
N.B. When Node 4 connects to other node’s server, the host node’s client will connect to Node 4 server.
N.B. For the purpose of this project, the whole Dencoin network is run in one computer, Nodes run in different ports and one Node is one instance of the dencoin application. Additionally each node is given a name to differentiate it from the others.
Blockchain And Mining
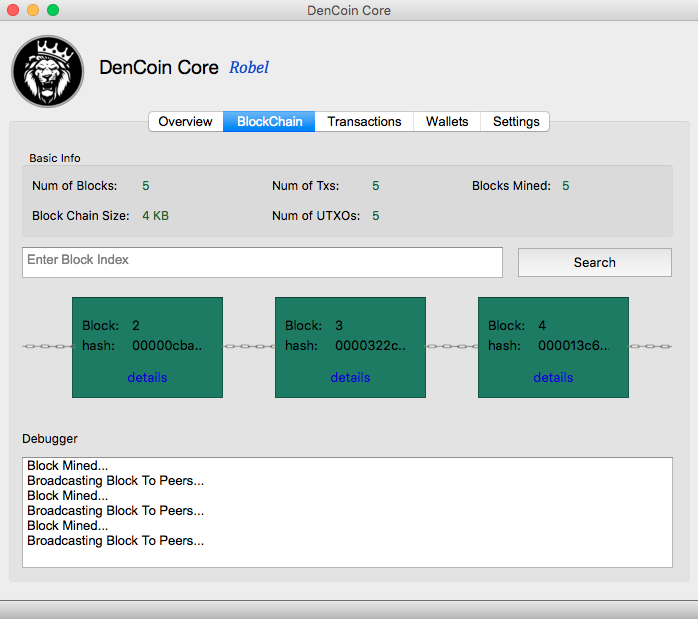
The above image shows the blockchain page of the Dencoin application. When the above screenshot was taken, the application was the only node running in the network.
In the basic Info group, users can see the number of blocks in the blockchain, blockchain size in bytes, number of transactions, number of unspent transaction outputs and blocks mined by the node.
Next we have a search box where a user can search for a particular block in the blockchain by typing the block index. Once a block is found with that index, a new window will appear with the block details.
In the Debugger textbox, every action taken by the node and current state is displayed.
When the Node is running, it’s always trying to mine a block every 20 seconds. If it mines a block, it will add it in the blockchain and broadcasts it to peers as seen on the debugger textbox. If a new block arrives from other nodes before it mines a block, it will validate and accept the new block and reset the miner.
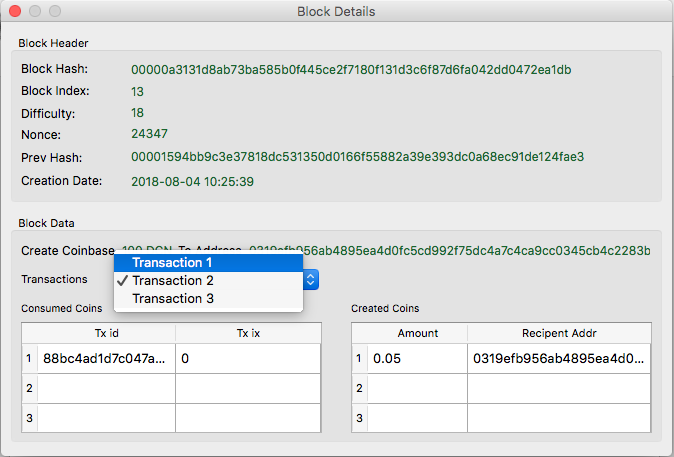
To display the blockchain in a user-friendly manner, there are three green boxes linked in chains that display the last three blocks of the blockchain. Whenever a new block is mined or imported, the last two green boxes are shifted to the left and the last box is replaced with the new block. Every block contains a details button to view detailed information about the block. The details page is shown in the image below.
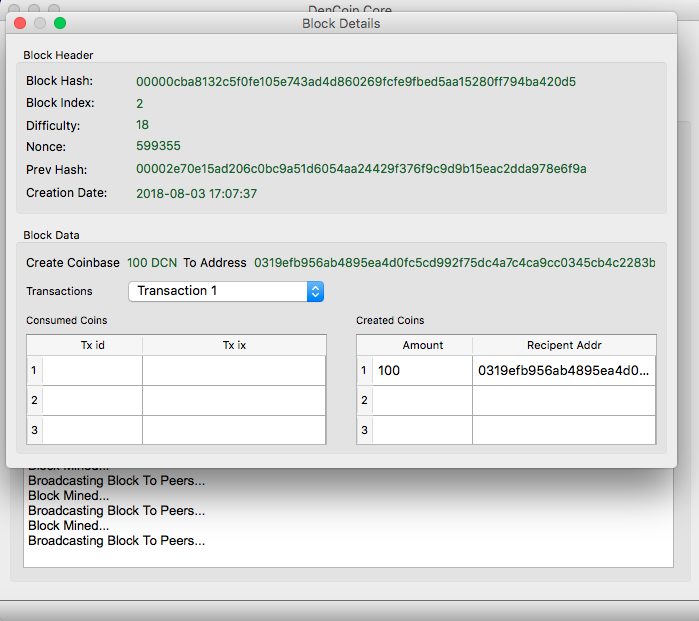
In the block details page, we have a block header that contains the hash of the block, block index, the difficulty level of the mining process, the nonce (the number found during the mining process), prev hash (the hash of the previous block that this block is connected to) and block creation date. The Block Data contains the transactions added in the block. The user can browse the transactions by navigating through the combo box. The block in the image above is an empty block, since there are no transaction added except for the transaction that rewards 100 DCN for the node that mined the block. The consumed coins and created coins will be explained in detail in the later sections.
N.B. During the mining process, if two blocks are generated at the same time, there will occur a fork, but when the next block is created it will extend from the block which was mined with greater cummulative difficulty or with the higher block index.
N.B. One of the downsides of the blockchain in this project is, the blockchain size is much bigger than it needs to be, since i saved the whole blockchain object rather than the block values in json or other types.
Wallets
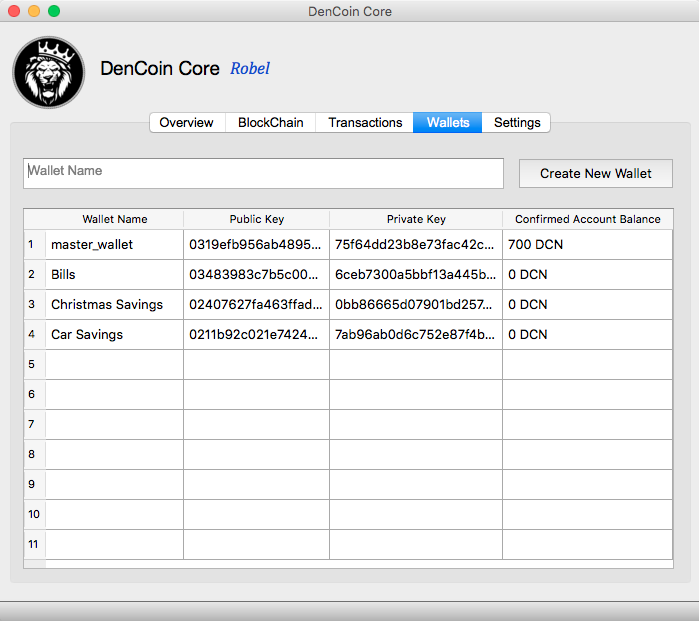
In the wallets page, users can create as many wallets as they want. When a new node is lauched, the application automatically creates a wallet called master_wallet. It’s where coins are rewarded if the node mines a block. If the user wants to create a new wallet, he can write the name of the wallet in the text box and click create new wallet button. the name of the wallet is used to make it easier for the user to manage it.
The wallets page has a table that lists all the wallets the node has, and each wallet has name, public key, private key and account balance. If a user wants to transfer money from master_wallet to car savings wallet, he can create a transaction in the transactions page using car savings public key and amount to be transferred.
Transactions
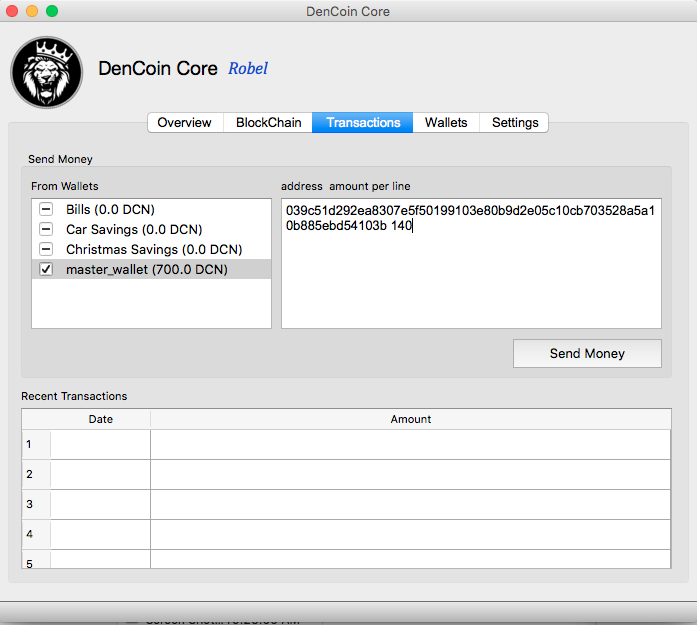
The transaction page is used to send money and view transaction history. When the transaction page is displayed, the node’s wallets are displayed in checkbox list to let the user select the wallet to send money from. In the image above the user wants to send 140 DCN to another node. To send the money, the user first checks the checkbox of the wallet to send money from, in this case master wallet. then the user clicks on the master_wallet list to clear the address textbox. The user then enters the public key of the receiver and the amount. The user can add multiple public keys in a new line. Here is the format
PUBLIC_KEY_1 AMOUNT_1
PUBLIC_KEY_2 AMOUNT_2
PUBLIC_KEY_3 AMOUNT_3
PUBLIC_KEY_4 AMOUNT_4
.
.
.
After send money button is clicked, and the payment is successful, the following page appears.
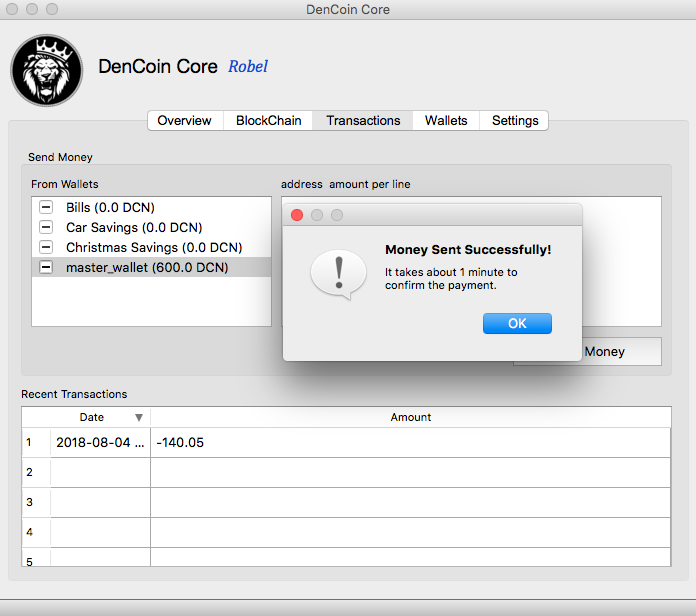
You can see on the Recent Transactions table, that 140.05 DCN has been deducted from the sender node. The 0.05 DCN is a transaction fee the node gives for whoever mines the block that this transaction will reside in.

The receiver node Alice will get the 140 DCN and the balance now is 540 DCN as shown above.
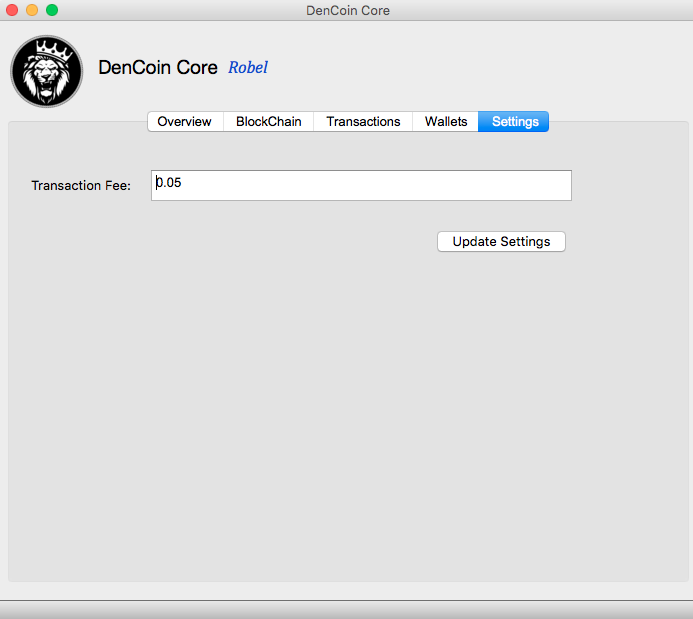
On the above image you can see that the user can edit the transaction fee he is willing to give to the miners. The bigger the transaction fee the quicker the miners will add the tranasction in the blockchain for the sake of getting the transaction fee.
Why does the node want the transaction be added in the blockchain as fast as possible?
Because in cryptocurrecy, we have a confirmed and unconfirmed account balance. A confirmed account balance is calculated from transactions which are currently added in the blockchain and the block containing the transaction is made permanent by appending N blocks to it. In this project, a transaction is confirmed if 1 new block is appended to the block containing the transaction. The image below shows account balance page.
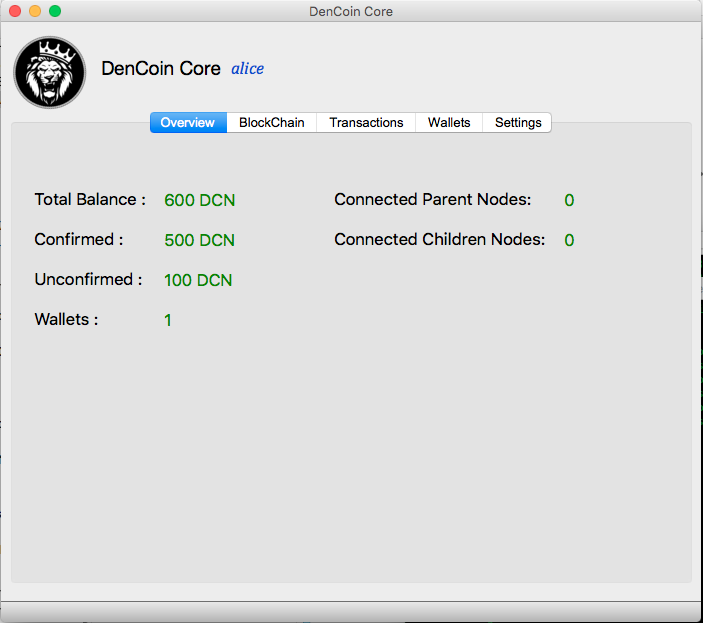
Here you can see the total balance is 600 DCN, but only 500 DCN is confirmed. It means that if the user wants to spend money, he can only use 500 DCN.
Next let’s look at the transaction we sent in the blockchain block details page.
We now have located the block that contains the 140 DCN transaction. As shown in the image there are three transactions in the block. let’s look at them one by one.
Transaction 1
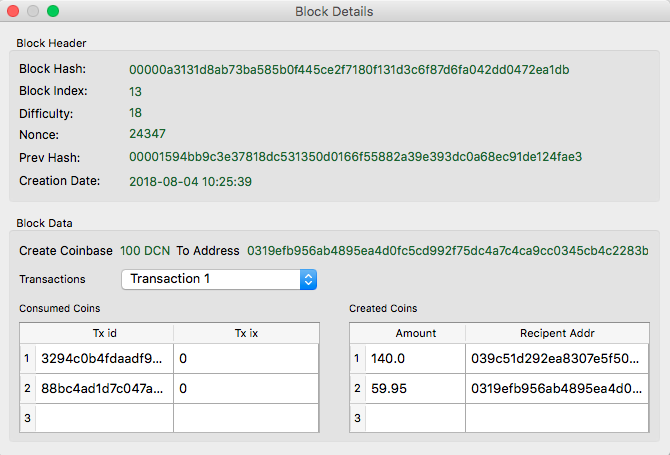
Before explaining the first transaction, There is a term that is important to remember, that is Immutable Coins. In crytocurrency, a coin can’t be split in any way. In other words a 100 coin can’t be split into 70 and 30 coins. What happens is a 100 coin is removed and 30 and 70 coins are generated. In the above transaction the sender node wants to send 140 DCN to another node, So the sender node will get 200 DCN it owns, destroys it and generates 140 DCN for the receiver node, 0.05 DCN to whoever mines the next block and 59.95 DCN back to itself. therefore the sender node has an account balance of 59.95 DCN. You can see the created coins in table at the right side. In the left side of the page you can see Consumed Coins table. And in the table there are columns named tx id (transaction id) and tx ix(tranasction ix). It’s mentioned before that to send 140 DCN the sender looks for unspent coins to send, and the sender node can find them using tx id (transaction id) and tx ix(tranasction ix) in the utxo (unspent transaction output) lists.
Transaction 2
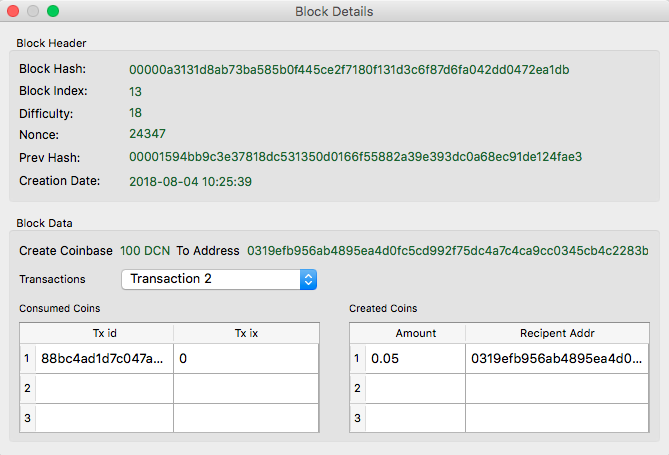
In the second transaction, we have 0.05 DCN transaction fee sent to the node that mined this block.
Transaction 3
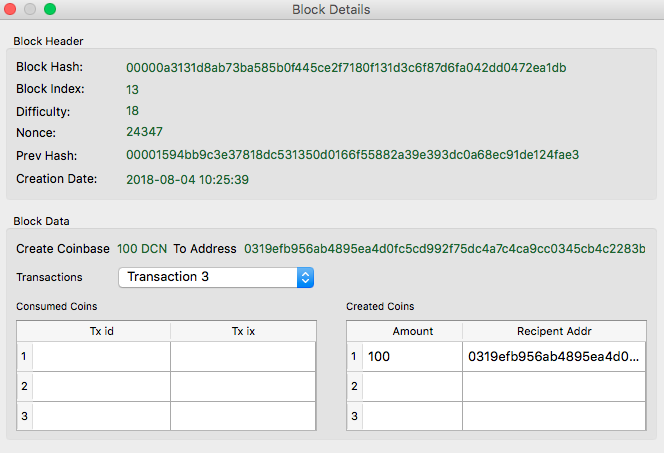
In the third transaction, we have 100 DCN rewarded to the node that mined this block.
How to Launch Dencoin
To launch Dencoin
- Go to the directory where the source code is kept
- Activate anaconda environment
source activate <ENV NAME> - To launch Dencoin, Use the following format
python dencoin.py <NODE NAME> <OPTIONS> <PORT 1> <PORT 2>

<NODE NAME> - Any suitable name for the node.

<OPTIONS>
		-gen : Use it to launch the first (genesis) node in the network
		-ft  : Use it for launching a node for the first time.
		-nft : Use it for launching a node that has been shutdown.

<PORT 1> - the port where the node listens to incoming connections

<PORT 2> - the port of another node that this node will try to connect to.
           Remember that if this node is a genesis node, then leave the port number.
Examples
Genesis Node - python dencoin.py Robel -gen 10000
First time Node - python dencoin.py Alice -ft 11000 10000
Waking a Node - python dencoin.py Mary -nft 11200 10000
Demo
You can find the source code of this project here.